P400 Miura Service and Parts

Current service articles for P400 -

2) Miura rear hub service - November 2007- wheel bearings, seals, upper ball joint, lower pivot asembly
Notes on Miura rear hub service
Graphics/Photos
Reason for service -
Rear wheel bearings - remove, inspect, replace, reinstall.
Rear hub seals - replace.
Rear upper ball joint boot rubber boot - replace deteriorated boot.
Rear hub lower pivot assembly - remove , inspect, repair , reinstall.
Rear suspension chassis bushing upper and lower- inspect, repair/replace.

Ball joint boots - I have purchased, received, trial fitted rubber boots to replace all 6 of my failed ball joint boots.  My ball joints are fine, but the rubber boots are toast! These are available thru ebay.com.uk   item 320035340914   paypal and cheap air mail shipping,  nice seller ,      search for - David Brown International tractor track rod end boots.   These new boots fit my Miura 4 uppers and will stretch easily to fit 2 front lowers as well.   I hope this can help anyone involved in this task of suspension service.  Do not confuse this with tie rod ends.
Miura madness
Craig
At 02:20 PM 8/27/2008, you wrote:Julian, you have 34,33, threaded off, 18 and 19 shaft come out as an assembly. you can motorcycle tire lever 20 seal out of the hub. I have been able to tap 32 inner hub out of 29 bearing with out problem, ...........but this could be a problem, and you say it is? the 21 snap rings only secure the roller 22, the 23 spacer is in your way and you must work around or actually thru it. Maybe this is the problem, you might be tapping on the 23 spacer instead of 32?

Julian, i  remember this task and it took some robust tapping with steel tools. The first time my tooling was smaller than the ID, maybe 34mm and it rolled around slightly in the 40mm hole at the shaft spline taper in 32 and buggered it up slightly and 32 needed some file work to correct. i suggest a 39mm drift tool to make sure you stay off the spline ID taper and it works much better.


1) Miura front wheel bearings - October 2007


Notes on front service
Graphics/photos
I pulled my drivers side front hub today to give it an every 40 year service. Thanks to reading Jack Riddell's write up at VLG, it came off quite nicely. I pulled the whole suspension off, as it was easier to accomplish and i wanted to work on all in the shop. No hub nut cotter pin (CPN-02066) was used, i had to unbend a bendover lock washer and a gentle air impact to remove the spindle nut, lefthand.
I used a 3 jaw puller, as Jack shows, to remove the hub.....tightened it up, one rap with with a dead blow hammer, smoothly pulled off. I then used a Snapon slide hammer with an small expanding two jaw head and the small bearing hammered right out , in fact i engaged the small end of the spacer with the 2 jaws and this seemed to work very well for me.
I remembered to pull the 2.5mm allen lock screw, it looked like it had some blue loctite, but removed without a loctite feel.
i hated to do it, but i used an appropriate punch to turn the seal plate out (left hand thread) with a little hammer effort, seems like fitted tool would be better, but i didnt stop to fab one.
The large wheel bearing drove out smoothly with appropriate effort, using a 1/2"drive extension and socket
the old lip seal in the threaded retainer was a little pesky to remove without struggle. I threaded the retainer back into the hub and kept punching around the circumference until it finally moved. The lip seal was brittle and just fell apart.

Found the following marking on the OEM large bearing,  small bearing  and seal:
608831A RIV
1AA RIV
rubber dike 52x40x7
photo pdf file
So i went shopping for pieces thru Lambostuff and found the prices way higher than i expected -
608831A - $515 ea
8502010 substitute for 1AA - $250 ea
seal was $50 ea
 I have not warmed up to a $1700 front wheel bearing parts purchase. ideas are welcomed. The 608831A is a 32 x 62 x 20 double row ball and is the only real challenge. The small double bearing is easily acquired thru bearing house as well as the seal. Anybody been down this road? It affects a lot of vintage Lambos.


Lambostuff.com


translation chart for alpha characters
this is not current, so it may not translate to 2008 Miura part numbers, but most will.
engine
MT - 11   Teste -  Heads
MD - 12    Distribuzione          
MA - 13   Almentazione.
MM - 14   Manovellismo e alberto
MO - 15   Pompa e circuito e olio
ME - 16    Impianto elettrico
MW - 17   Pompa e circuito acqua
MB - 18   Basemento e coppa
MI - 20  Iniezione - fuel inj
transmission
TF - 21   Frizione
TA - 22   Albero di trasmissione
TD - 23   Differenziale
TC - 24   Cambio
TS - 25   Semiassi
TI - 26   Transmissione idraulica
TE - 27  Transfer case
PP - 28  Piede poppieri
brakes
FA - 31   Freni anteriori
FP - 32   Freni posteriori
FM - 33   Freno a mano
chassis
CI - 40  Idroguida - pwr steering
CT - 41   Struttura telaio - frame
CP - 42   Pedaliera - pedals
CS - 43   Sterzo e comandi - steering
CM - 44   Tubi scarico - exhaust
accessories
CO - 45   Condizionatore - ac
HP - 46   Air pollution
CR - 47   Riscaldatore - heater
BT - 48   Trousse per vettura - tools/kit
VR - 49  Verricello - elec winch
suspension
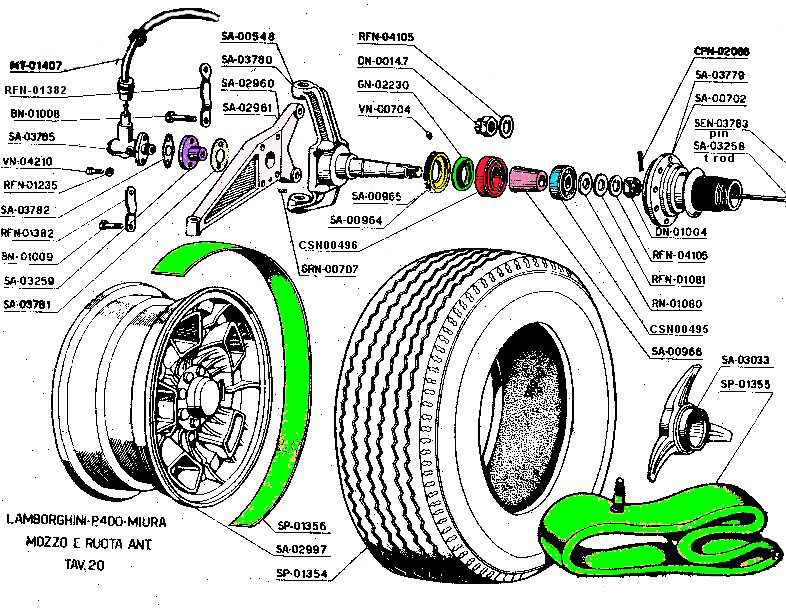
SA - 51  Sospensione  anteriore
SP - 52  Sospensione  posteriore
PC - 53  Pneumatici
coachwork
BA - 59  Accessori
BC - 60   Strumentazione
BS - 61   Riscaldatore tergi
BI - 62   Impianto benzina - system fuel
BE - 63   Illuminazione - lighting
BI - 64   Carrozzeria 350 GT e 400 GT 2+2
BI - 65   Carrozzeria  Miura
BI - 66   Carrozzeria  Islero
BI - 67   Carrozzeria  Espada
BI - 68   Carrozzeria  Jarama
miscellaneous
80, 81, 82, 83, 84, 85, 86, 87, 88, 89   Diversi - misc
AT - 90  Attrezzature - special service tools
VA - 91  Varie - misc
OM - 99  Omologazione
examples
gas cap - 6201496 = BI 01496
battery strap - 1603794 = ME 03794
o-ring - 8603298

I would like get some sponsors for this website.
please email me